The wave penetration project: Blender interlude
In this post I will describe how to add a new modifier similar to the ocean modifier into Blender.
Artists can use Blender modifiers to modify object geometry on the fly.
After importing a mesh of the studied coastal domain, my modifier will update the Z component of all vertices using the formula:
where \(\eta : \Omega(\mathbb{R} \times \mathbb{R}) \to \mathbb{C}\) is the solution of the mild-slope equation.
The modifier will allow users to keyframe the time parameter \(t\) to animate the water surface.
Mesh import
Blender is a mix of C/C++ and Python. The Blender Python API can be used for task automation as well as adding extra features. Unfortunately it’s not possible to implement a new modifier using the Python API. One reason for that could be that updating large model geometry on the fly using Python is too slow.
The modifier will have to be implemented in C but before that we will import the mesh using the Python API.
Importer skeleton
The importer will parse a .mesh file and will add the following objects to the scene :
- a mesh for the water;
- polylines for the boundaries (optional, enabled by default);
- a mesh for the bottom geometry (optional, disabled by default)
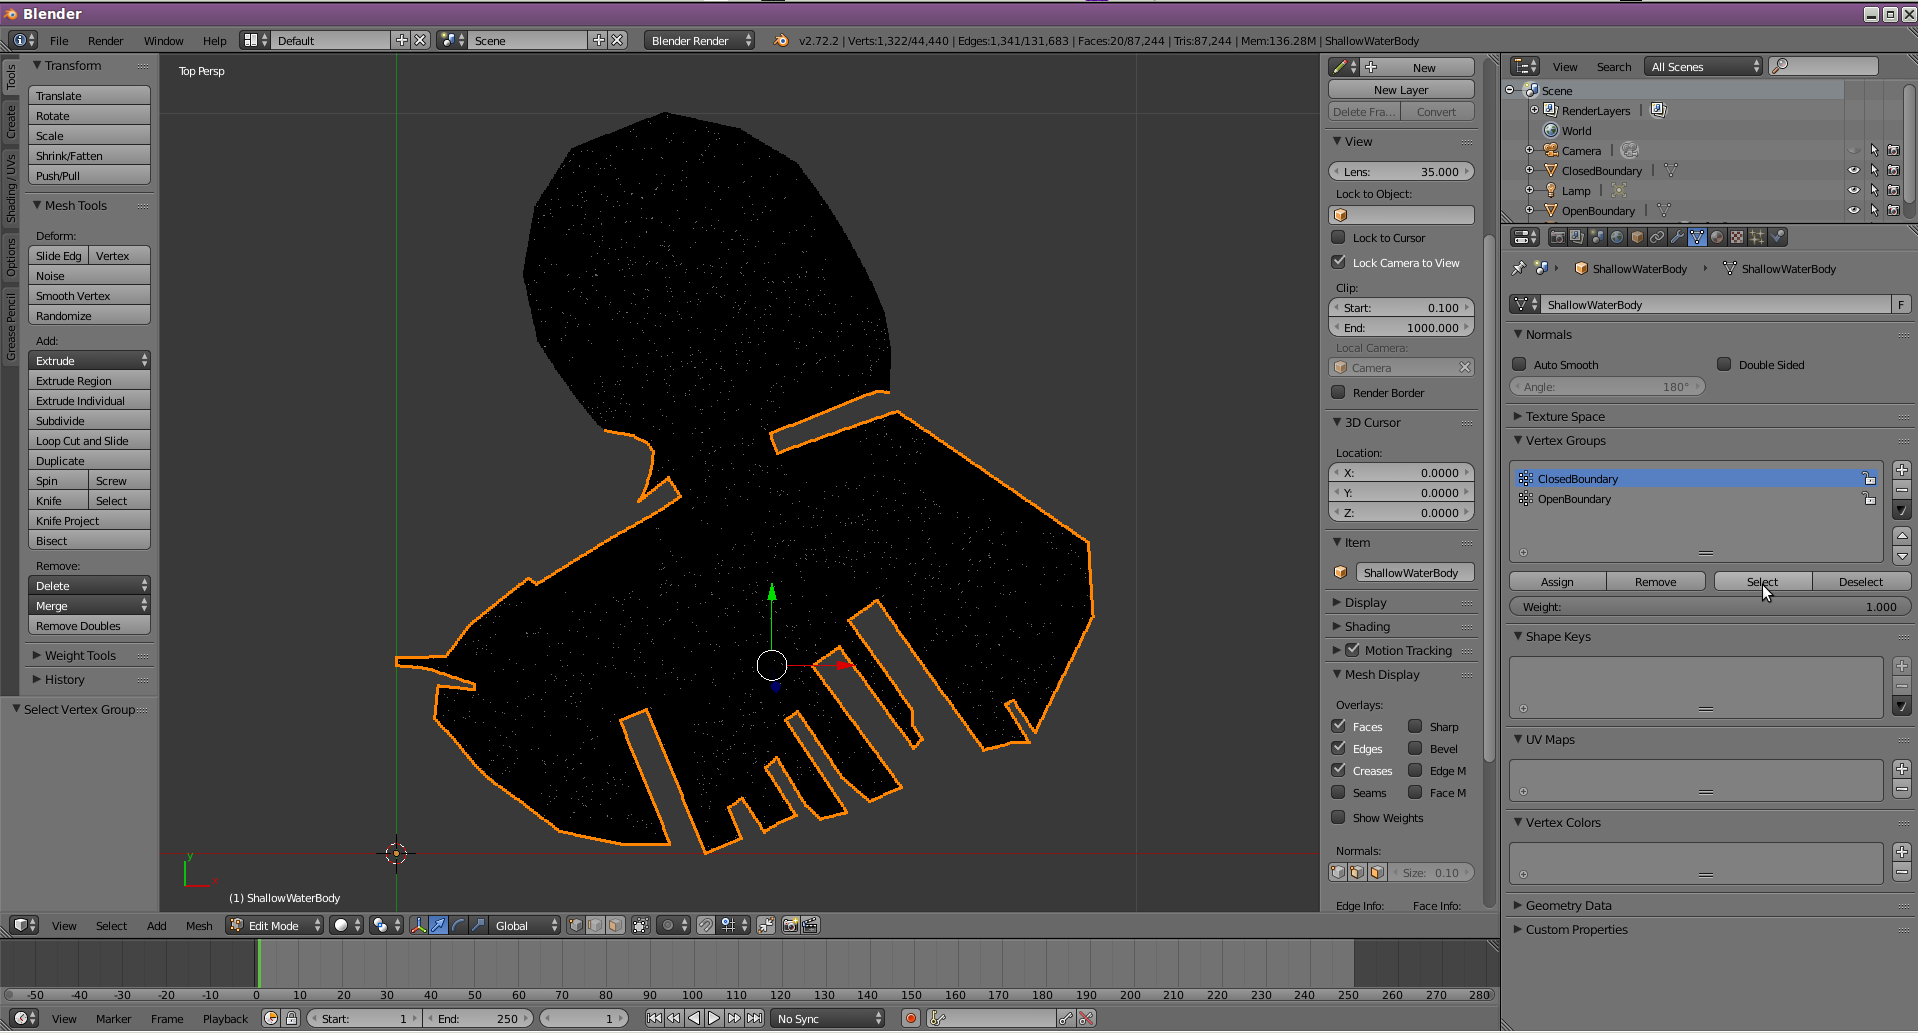
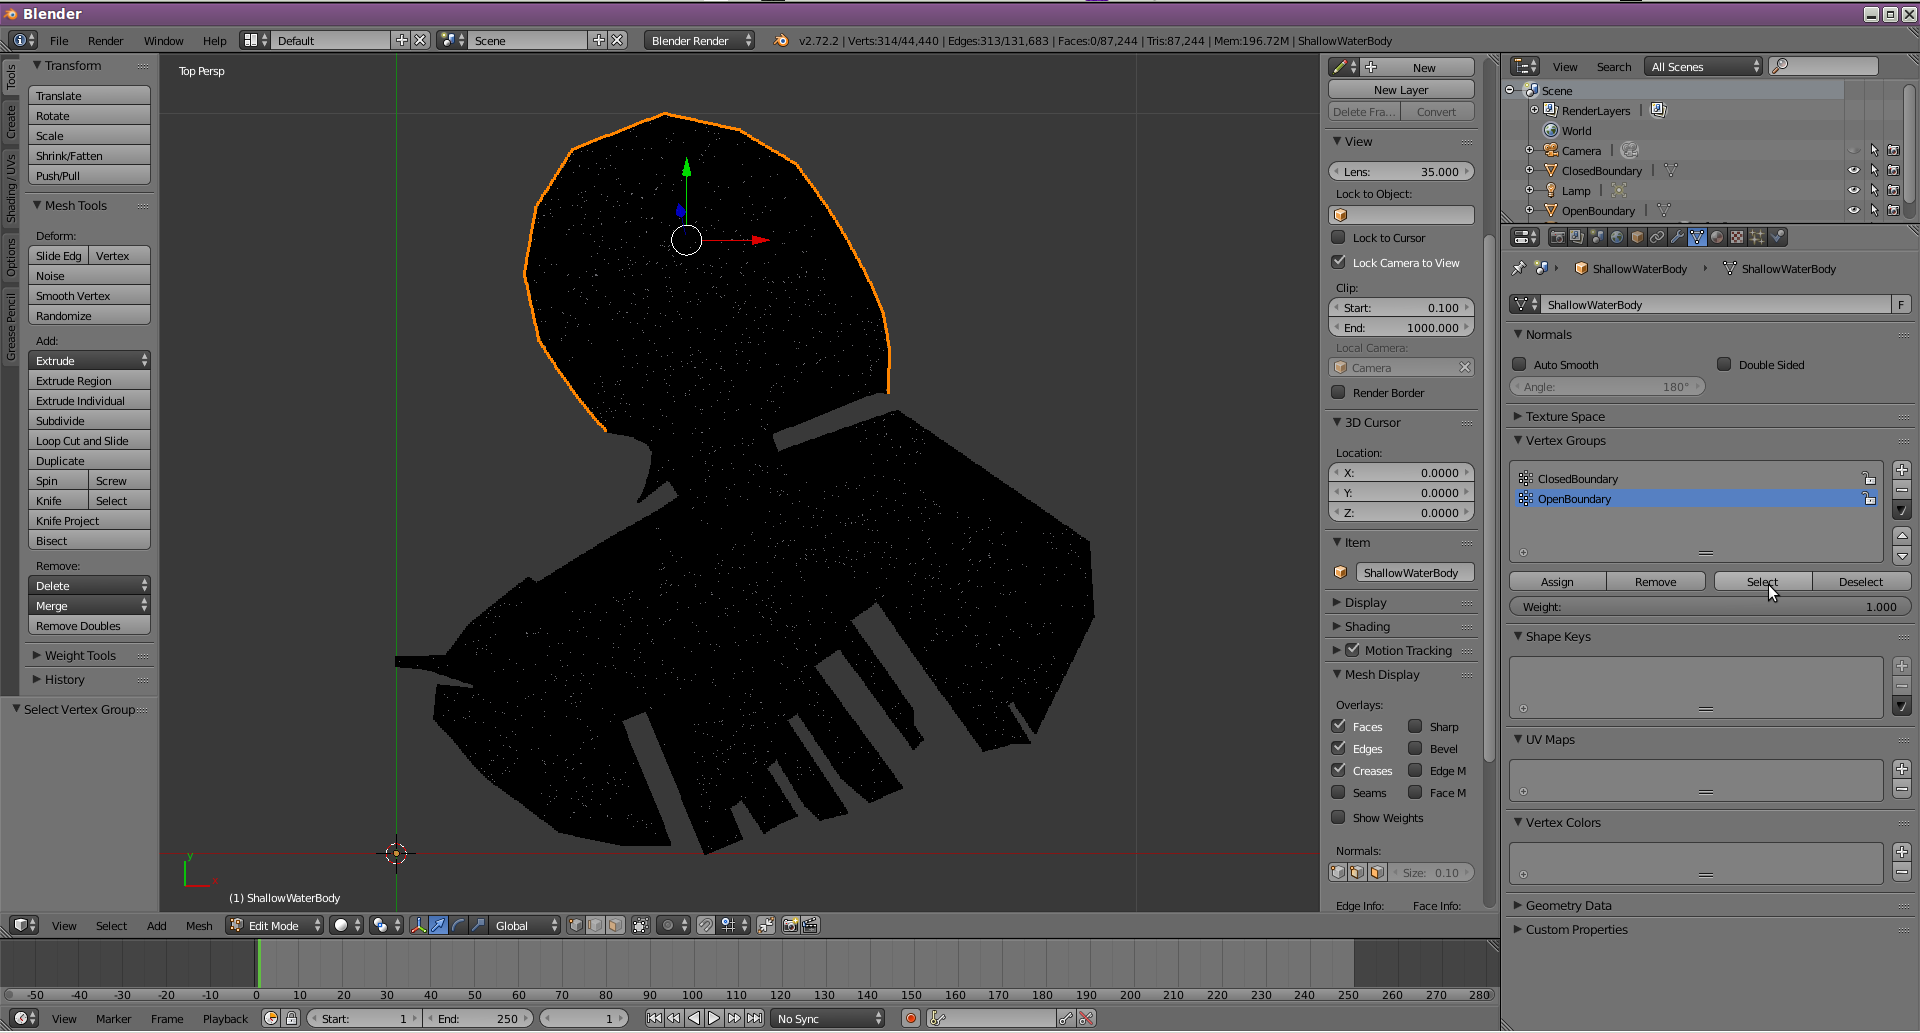
Both meshes will have their boundary vertices assigned to distinct vertex groups.
A concise tutorial is included in the API documentation.
The “shallow water body” importer plugin can be found on my github
A Blender plugin can be implemented as a stand alone Python script or as a module. The plugin must declare:
- a
bl_infodictionnary describing the plugin; - a
register()function; - an
unregister()function
bl_info
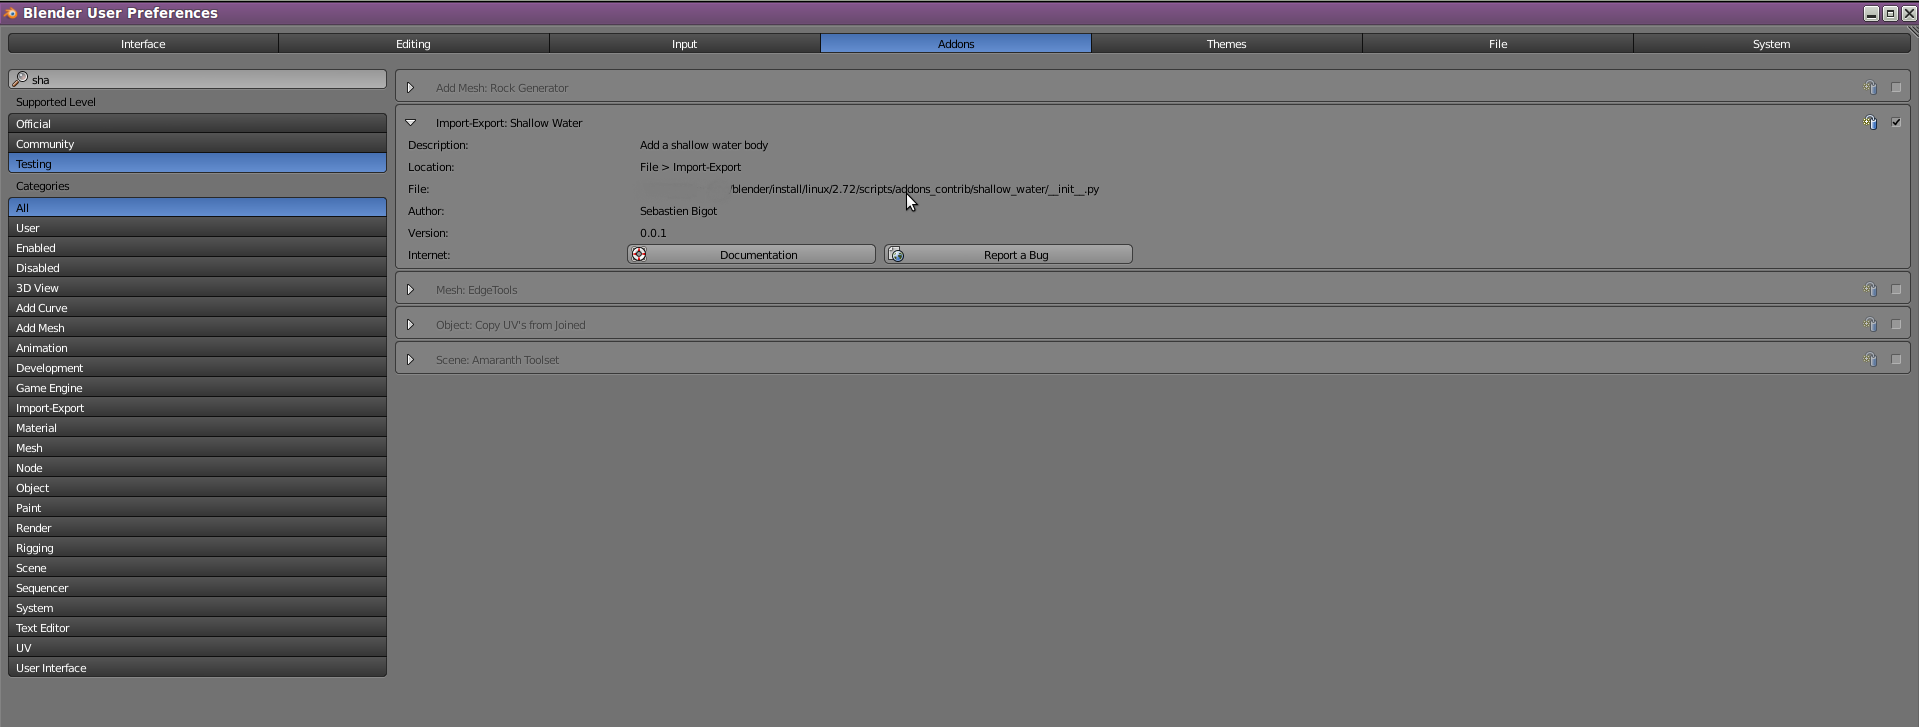
The bl_info meta-data are mainly used by the User Preferences => Addons dialog, to populate the UI describing the plugin to the user:
bl_info = {
    "name": "Shallow Water",
    "author": "Sebastien Bigot",
    "version": (0, 0, 1),
    "blender": (2, 72, 0),
    "location": "File > Import-Export",
    "description": "Add a shallow water body",
    "warning": "",
    "wiki_url": "http://ssrb.github.io",
    "category": "Import-Export",
}
register & unregister
register() (respectively unregister()) is called when the plugin is enabled (respectively disabled).
These functions usualy add new UI elements bound to custom Blender operators.
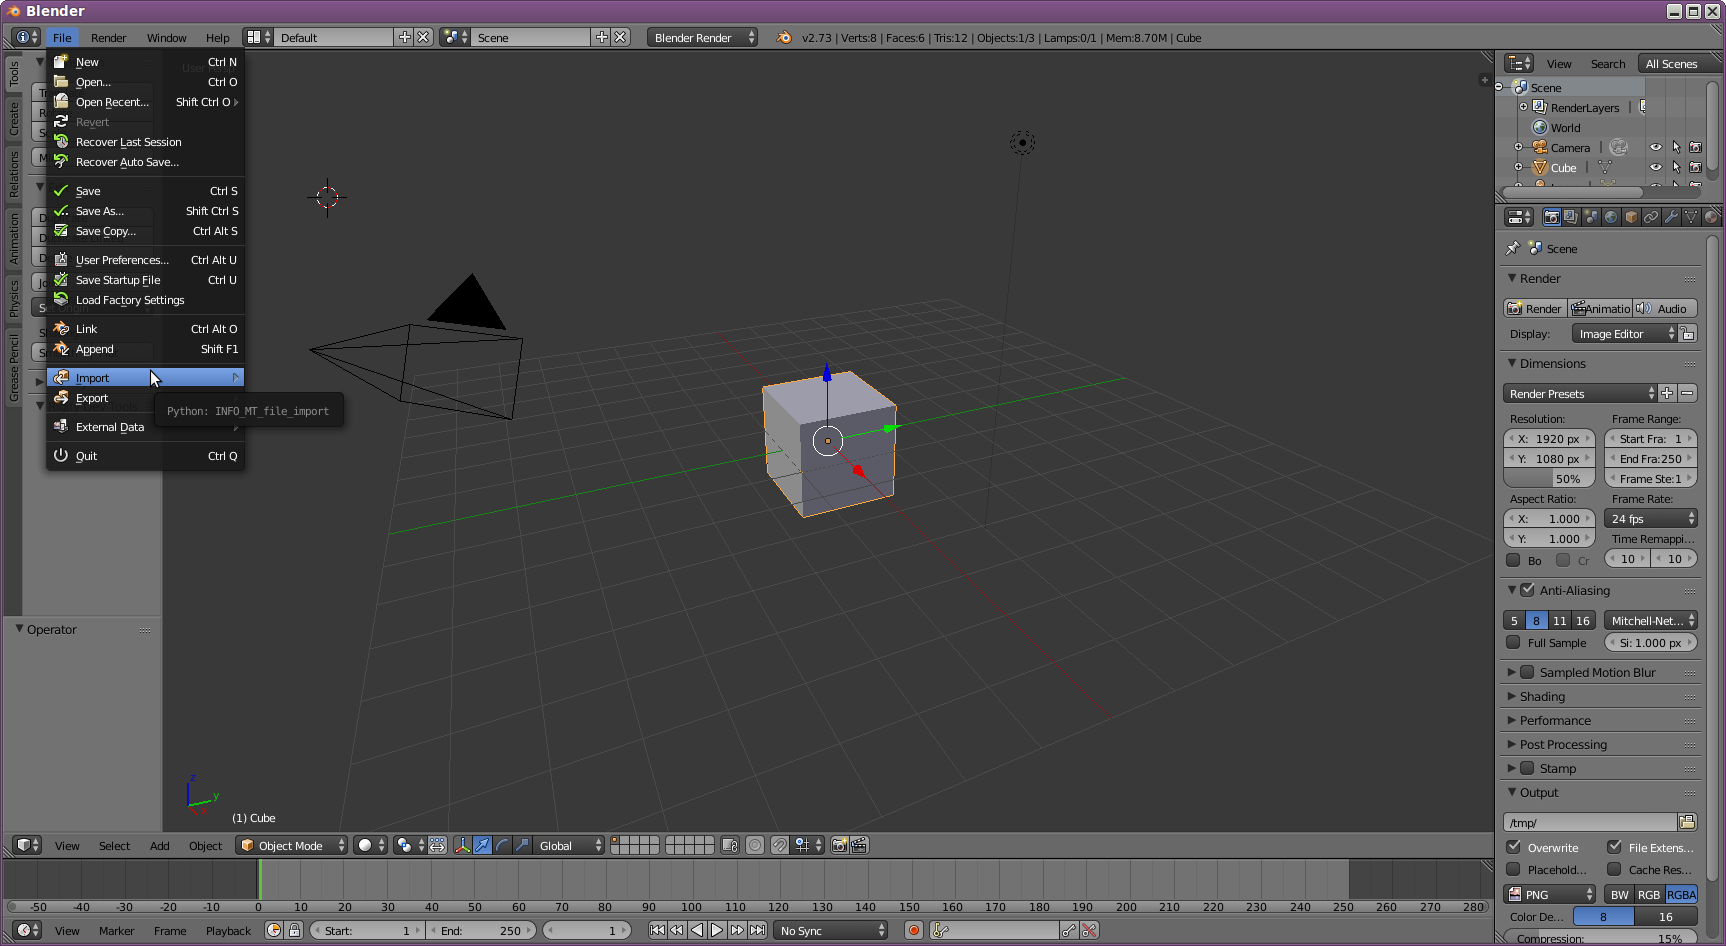
We register the plugin and add a new entry to the File => Import sub menu:
def register():
    bpy.utils.register_module(__name__)
    bpy.types.INFO_MT_file_import.append(menu_func_import)
You can find the Python name of the UI element of interest by simply “mouse hovering”:
menu_func_import will then be called when the UI is exercised and given the oportunity to modify its layout,
for example adding a clickable text bound to an ImportShallowWaterBody operator:
def menu_func_import(self, context):
    self.layout.operator(ImportShallowWaterBody.bl_idname, text="Shallow Water Body (.mesh)")
An operator is another abstraction allowing the user to furthermore interact not only with the UI but with the scene itself.
The Blender API comes with a couple of helpers in order to build the operator’s UI. One such helper is the ImportHelper
which creates a customizable file explorer dialog:
class ImportShallowWaterBody(bpy.types.Operator, ImportHelper):
    """Import a Shallow Water Body"""
    bl_idname = "import_scene.shallow_water_body"
    bl_label = 'Import Shallow Water Body'
    bl_options = {'UNDO'}

    filename_ext = ".mesh"
    filter_glob = StringProperty(default="*.mesh", options={'HIDDEN'})

    separate_boundary_objects = BoolProperty(
            name="Create polyline objects for each boundary",
            description="In addition to the boundary vertex groups, create separate polyline objects for each boundary",
            default=True
            )

    import_bottom = BoolProperty(
            name="Import the bottom geometry",
            description="If a depth file is found, create a bottom geometry object",
            default=False
            )

    def execute(self, context):
        from . import shallow_water
        keywords = self.as_keywords(ignore=("filter_glob",))
        return shallow_water.load(self, context, **keywords)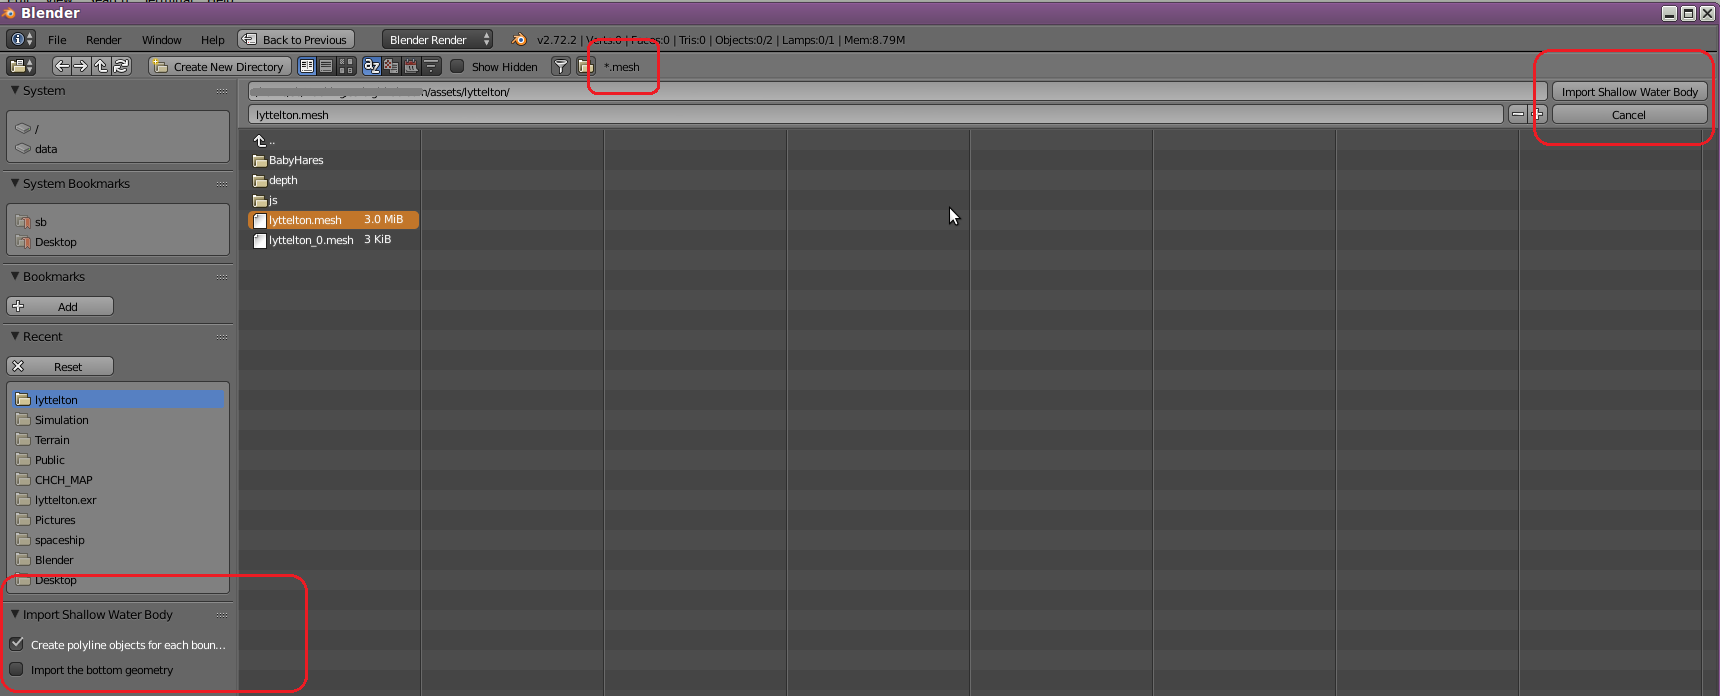
The execute method of the operator is called when the “Import Shallow Water Body” button is clicked:
interaction with the scene is achieved through the context.
I’m parsing a file and creating a few objects here but what you do next is only limited by your ingenuity.
Here are a few examples:
Create a mesh and an object from a list of vertices, faces and edges
import bpy
from bpy_extras import object_utils
mymesh = bpy.data.meshes.new(name)
mymesh.from_pydata(verts, edges, faces)
mymesh.update()
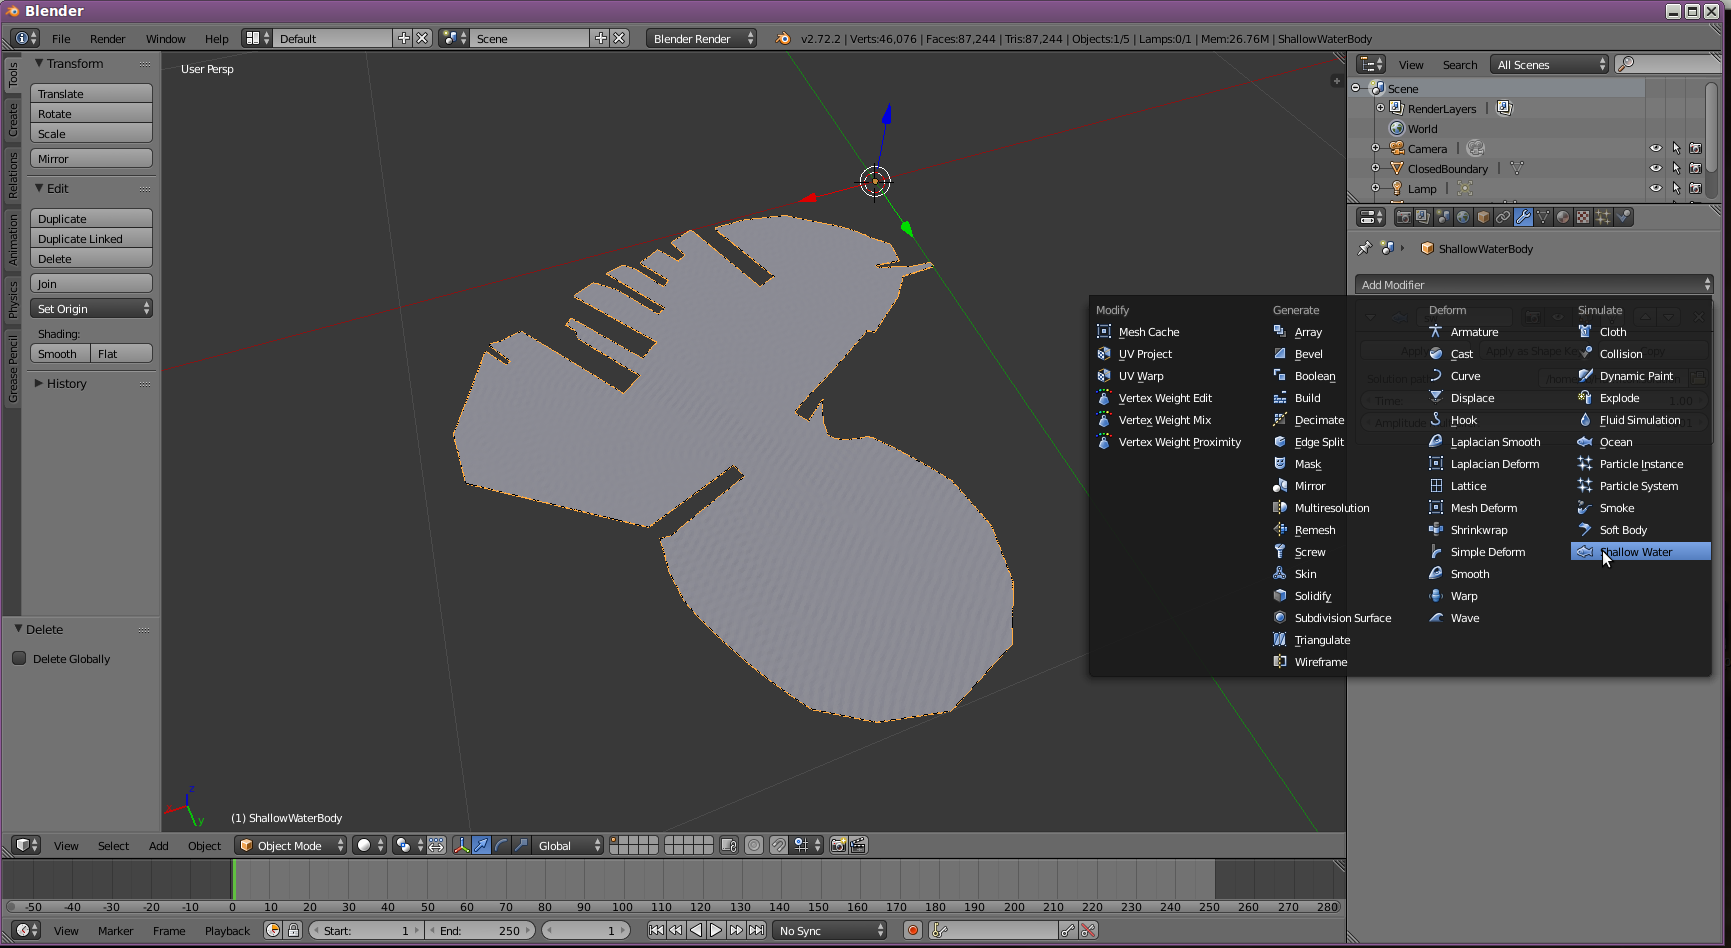
myobject = object_utils.object_data_add(context, mymesh, operator=None)Add & setup a modifier
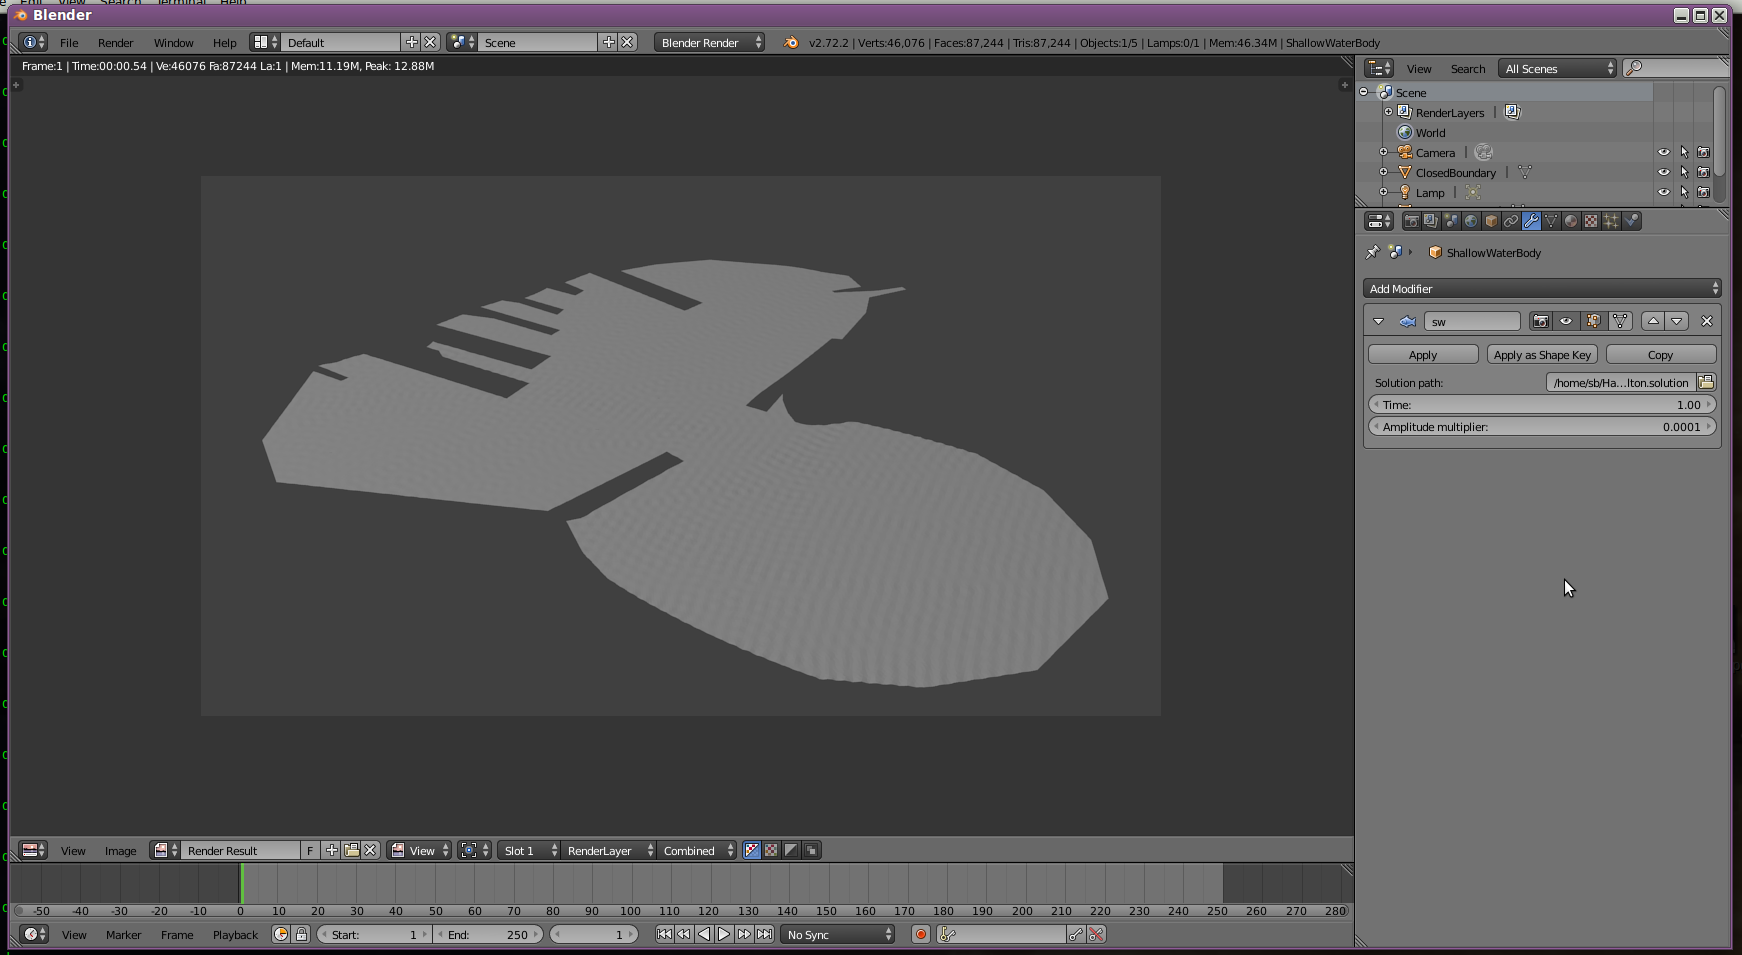
mymodifier = myobject.modifiers.new("sw", type='SHALLOW_WATER')
mymodifier.solution = solutionfile
Add & setup a vertex group
myvgrp = myobject.vertex_groups.new("ClosedBoundary")
myvgrp.add(vertices, 1.0, 'REPLACE')
Mesh displacement
Now that we can import the geometry into Blender, let’s apply the solution on the fly. This is a bit more involved and requires you to setup a build environment and add some C code to Blender’s guts. Multiple build setups are described here. I choosed scons on both Linux and Windows.
Modifier C skeleton
Creating a new modifier requires you to update Blender’s DNA, RNA and UI. Here is an explanation from Ton Roosendaal I found here about DNA & RNA:
Q: do DNA and RNA actually stand for anything?
They’re analog to the biological meaning. Blender DNA is as old as Blender, it’s a long string with encoded types for the entire internal structure of Blender’s data, saved in every .blend, and in every Blender binary. With this DNA it can read older or even newer files. Blender is even “aware” of its own data types, i.e. you can give it a pointer, and Blender can find the item named “vertex” in it. This makes .blend files still readable, even when saved in 1.00 .
Q: .. and RNA?
That’s a 2.50 feature, a system to wrap DNA into a nice API to read/set Blender data and properties. It actually means “messenger DNA”, which is not totally correct, because RNA makes DNA in cells. Our RNA can auto-generate a Python data-access API, and will allow feature “everything animatable”, auto-button-list-view of data and it will even handle dependencies in future.
DNA
This part is about defining the data which are going to be serialized into the .blend files.
First you want to add a new value to the ModifierType enum in source/blender/makesdna/DNA_modifier_types.h:
typedef enum ModifierType {
  [...]
  eModifierType_ShallowWater      = 49,
  NUM_MODIFIER_TYPES
} ModifierType;
Next, and in the same file, define a structure for your modifier’s data. This structure might need some padding. Mine needs to keep a path to a solution file, an array of complex numbers, an epoch as well as an amplitude multiplier:
typedef struct ShallowWaterModifierData {
       float *real;
       float *imag;
       float time;
       float amplitude_multiplier;
       char solution[1024];
} ShallowWaterModifierData;
RNA
The next step is to modify the makesrna code generator used to implement the plugin system and generate the Python API.
It’s also required if you want to keyframe using your modifier’s parameters.
In source/blender/makesrna/intern/rna_modifier.c, update
EnumPropertyItem modifier_type_items[] = {
  [...]
 {eModifierType_ShallowWater, "SHALLOW_WATER", ICON_MOD_OCEAN, "Shallow Water", ""},
  {0, NULL, 0, NULL, NULL}
};
and
static StructRNA *rna_Modifier_refine(struct PointerRNA *ptr)
{
  [...]
  switch ((ModifierType)md->type) {
    [...]
    case eModifierType_ShallowWater:
      return &RNA_ShallowWaterModifier;
    [...]
}
then write a function describing your modifier’s data:
static void rna_def_modifier_shallowwater(BlenderRNA *brna)
{
 StructRNA *srna;
 PropertyRNA *prop;

 srna = RNA_def_struct(brna, "ShallowWaterModifier", "Modifier");
 RNA_def_struct_ui_text(srna, "ShallowWater Modifier", "Shallow Water Simulation");
 RNA_def_struct_sdna(srna, "ShallowWaterModifierData");
 RNA_def_struct_ui_icon(srna, ICON_MOD_OCEAN);

 prop = RNA_def_property(srna, "time", PROP_FLOAT, PROP_NONE);
 RNA_def_property_float_sdna(prop, NULL, "time");
 RNA_def_property_ui_text(prop, "Time", "Current time of the simulation");
 RNA_def_property_ui_range(prop, -FLT_MAX, FLT_MAX, 1, -1);
 RNA_def_property_update(prop, 0, "rna_Modifier_update");
 [...]
}
and make sure it’s called
void RNA_def_modifier(BlenderRNA *brna)
{
  [...]
  rna_def_modifier_shallowwater(brna);
}
Finaly, in source/blender/makesrna/RNA_access.h, forward declare
extern StructRNA RNA_ShallowWaterModifier;Done with the plumbing ! We can implement the modifier. The modifier related structures and API are documented in the source/blender/blenkernel/BKE_modifier.h file.
My deform modifier can be found here. Here’s the modifier definition:
ModifierTypeInfo modifierType_ShallowWater = {
  /* name */              "ShallowWater",
  /* structName */        "ShallowWaterModifierData",
  /* structSize */        sizeof(ShallowWaterModifierData),
  /* type */              eModifierTypeType_OnlyDeform,
  /* flags */             eModifierTypeFlag_AcceptsMesh |
                          eModifierTypeFlag_SupportsEditmode |
                          eModifierTypeFlag_EnableInEditmode,
  /* copyData */          copyData,
  /* deformVerts */       deformVerts,
  /* deformMatrices */    NULL,
  /* deformVertsEM */     deformVertsEM,
  /* deformMatricesEM */  NULL,
  /* applyModifier */     NULL,
  /* applyModifierEM */   NULL,
  /* initData */          initData,
  /* requiredDataMask */  NULL,
  /* freeData */          freeData,
  /* isDisabled */        NULL,
  /* updateDepgraph */    NULL,
  /* dependsOnTime */     NULL,
  /* dependsOnNormals */  dependsOnNormals,
  /* foreachObjectLink */ NULL,
  /* foreachIDLink */     NULL,
  /* foreachTexLink */    NULL,
};
The definition has to be forward declared in source/blender/modifiers/MOD_modifiertypes.h
extern ModifierTypeInfo modifierType_ShallowWater;And registered in source/blender/modifiers/intern/MOD_util.c:
void modifier_type_init(ModifierTypeInfo *types[])
{
#define INIT_TYPE(typeName) (types[eModifierType_##typeName] = &modifierType_##typeName)
  [...]
  INIT_TYPE(ShallowWater);
#undef INIT_TYPE
}
I will just “describe” the deformVerts callback which apply the displacement based on the mild-slope equation solution.
It lazily parses the solution file (loadWaveComplexAmplitude) the first time deformVerts is called and fills two arrays with the real & imaginary components of the solution.
Every time, it applies the formula to the geometry, using the current value of the time parameter \(t\). This is done in parallel using OpenMP.
static void applyAmplitude(ShallowWaterModifierData *swmd, float (*vertexCos)[3], int numVerts)
{
  int vi;
  double ct = cos(swmd->time), st = sin(swmd->time);
  #pragma omp parallel for private(vi) if (numVerts > OMP_MIN_RES)
  for (vi = 0; vi < numVerts; ++vi)
  {
    vertexCos[vi][2] += swmd->amplitude_multiplier * (swmd->real[vi] * ct - swmd->imag[vi] * st);
  }
}

static void doShallowWater(ShallowWaterModifierData *swmd, float (*vertexCos)[3], int numVerts)
{
  static bool failedToLoadOnce = false;
  if (!failedToLoadOnce && !swmd->real && !swmd->imag) {
    failedToLoadOnce = !loadWaveComplexAmplitude(swmd, numVerts);
  }
  if (swmd->real && swmd->imag) {
    applyAmplitude(swmd, vertexCos, numVerts);
  }
}

static void deformVerts(  struct ModifierData *md, struct Object *UNUSED(ob),
                      struct DerivedMesh *UNUSED(derivedData),
                      float (*vertexCos)[3], int numVerts,
                      ModifierApplyFlag UNUSED(flag))
{
  doShallowWater((ShallowWaterModifierData *)md, vertexCos, numVerts);
}
UI
The UI is updated in release/scripts/startup/bl_ui/properties_data_modifier.py
def SHALLOW_WATER(self, layout, ob, md):

  row = layout.row()
  row.label(text="Solution path:")
  row.prop(md, "solution", text="")

  row = layout.row()
  row.prop(md, "time")

  row = layout.row()
  row.prop(md, "amplitude_multiplier")
And this is what it looks like:
Conclusion
As you can see you don’t need to be a half living God to add new features to Blender. Sadly, the rendered animation doesn’t look as good as I was expecting: even though we used a sound mathematical model to describe the behavior of a wave near the shore, the model only captures macroscopic behavior. This model alone probably won’t allow an artist to compose a believable realistic coastal environment as it’s missing all the “high frequency” details found in the real life.
In the next post I will try to add energy dissipation to the model: the equation won’t be linear any more.
blog comments powered by Disqus